Setup On Windows
The following was developed using Windows 7 and Visual Studio Community 2017 or 2019. The preferred method is to use Python 3. For now support is also provided to use the built-in Python 2, but Python 2 support is now a depreciated functionality.
Software setup
In order to run Basilisk, the following software will be necessary:
Cmake 3.14 or higher
Python 3.7.x
Visual Studios 15 or Greater
Swig version 3 or 4
(Optional) Get the GitKraken application to be able to pull and manage a copy of Basilisk
The following python package dependencies are automatically checked and installed in the steps below.
pandasnumpymatplotlibpytestPillowconan>=1.29.2parse>=1.18.0
Configuration
Strongly recommended to stick with default 64-bit installations. Decide whether target deployment is 32 (win32) or 64 (x64) bit. Which ever chosen you will need the matching python and software for that architecture.
Configuring Python
Python is installed using the Windows installer found on the Python website. Make sure to choose the correct installer for your architecture.
Install Swig
The standard windows swig version 3 or 4 is suitable for Basilisk (see Configuration
Instructions).
Download the swig zip file, which includes swig.exe file, and unzip it into somewhere like C:/Program Files/Swig
Configuring User Variables
Add SWIG and Basilisk paths into environment variables using the following steps:
Right-click on My Computer, Select Properties
Under the Advanced tab, Select Environment Variables
Under the User Variables panel, Select Path, and Click Edit
Add the
swig.exedirectory to your pathAdd the Basilisk library directory (
path2bsk/dist3/Basilisk) to your path. Here,path2bskis replaced with the actual path to the Basilisk folder.
For more information on how to configure the path Variable on Windows see this help link. Example added path formats:
PYTHON_INCLUDE = C:\Program Files\Python37\include
PYTHON_LIB = C:\Program Files\Python37\libs\python37.lib
Using A Python Virtual Environment
Attention
We strongly recommend using a python virtual environment while installing basilisk or running basilisk modules. For more info, read this. The virtual environment has the benefit that you won’t have conflicts with other versions of Python or python packages that your computer has installed. It lets you install packages specific to this environment and they won’t interfere with other python projects you may have. However, you must turn this environment on and off each time you want to use it.
The following steps show how to create, active ad de-activate a virtual environment. The remaining installation steps work regardless if done within a virtual environment or not.
In a Terminal window change your current directory to be the Basilisk folder, then create a virtual environment using:
$ python -m venv .venv
This creates a hidden folder inside the Basilisk folder which will store all the python packages and environment information.
Activate virtual environment when needing configure, build or run Basilisk:
$ venv\Scripts\activate
If the virtual environment is activated, users will see (venv) before the prompt
Deactivate the virtual environment to return to the normal operating system environment:
(venv) $ deactivate
Installing required python support packages
Basilisk uses conan for package managing. In order to do so, users must ensure
wheelis installed and installconan:(venv) $ pip install wheel conan
The conan repositories information is automatically setup by
conanfile.py.Warning
Don’t use the
conanbinary installed from the conan web site. This causes several issues with the current build system.Warning
If you are upgrading from a version of Basilisk prior to 1.8.0, be sure to delete the
.conanfolder in your home directory to create a clean copy compatible with the current build system.The following python packages are the minimum required packages for Basilisk. They are installed and checked for the correction version in the steps below.
pandasnumpymatplotlibpytestPillowconan>=1.29.2parse>=1.18.0
Optional Packages: The above directions install the Basilisk base software. There are a series of optional packages that enhance this capability, including
pytestto run an automated test suite of unit and integrated tests.
Build Project Process via Command line
When all the prerequisite installations are complete, the project can be built as follows.
The
conanfile.pywill setup, configure and run the Basilisk build. For a basic installation, from the root Basilisk folder use:(venv) $ python conanfile.py
This creates the Visual Studio 16 2019 IDE project in
dist3and builds the project. You can also specify the generator directly in this build process and select other versions of Visual Studio. For other configure and build options, including runningcmakedirectly, see Building the Software Framework. This process will verify that the minimum required Basilisk python packages are installed, and that the version is correct. If not, the user is prompted to install the package withpip3in the system or user folder.To test your setup you can run one of the Integrated Example Scripts:
For example, in the terminal window, make
basilisk/examplesthe current directory.Run one of the tutorial scenarios, such as:
(venv) $ python scenarioBasicOrbit.py
Building with IDE
Conan file will build the project by default. However, this can take longer to compile than building the Basilisk project in the IDE directly. Further, if you are developing for Basilisk you often just want to configure the Basilisk Xcode project file and not build right away. To change the default behavior disable the automatic build using:
Run this command to disable the build:
python conanfile.py --buildProject False
This will disable the build workflow so that you can build the project from the IDE.
Open the Visual Studio project file inside
dist3. This isbasilisk.slnon Windows.The source code should appear and be ready for use
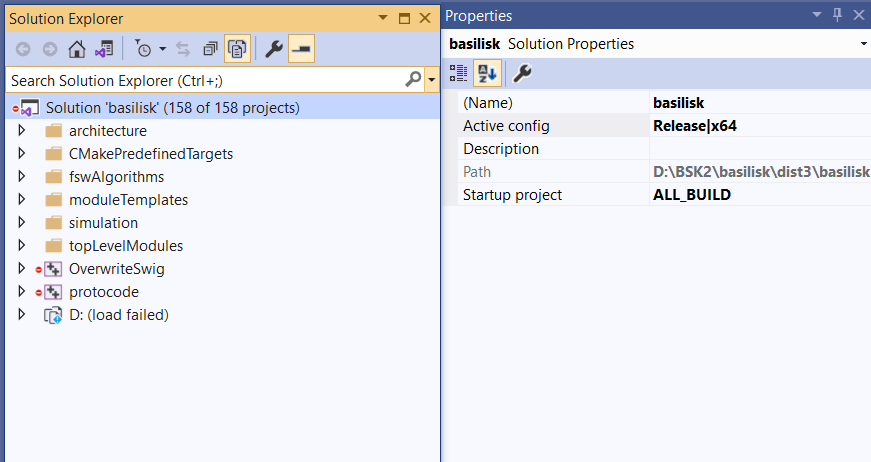
Change the active config to Release instead of debug for solution properties.
Within Visual Studio now go under Build menu/Build Solution to build.